A basic React components implement a render method that takes input data and returns what to display. For the purpose of this tutorial, it will also set initial state and have event handler to change state and re-render. If you are new to React, you may also want to visit React JSX tutorial.
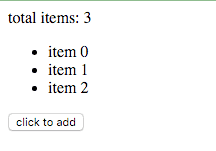
Here is the screenshot of final outcome:

Basic React component with props and click handler
Here is the html and jsx code used in this tutorial and how it renders:
<script src="https://fb.me/react-0.14.7.js"></script>
<script src="https://fb.me/react-dom-0.14.7.js"></script>
<script src="https://cdnjs.cloudflare.com/ajax/libs/babel-core/5.8.23/browser.min.js"></script>

<div id="mylist"></div>

<script type="text/babel">
var MyList = React.createClass({
  getInitialState: function() {
    return {count: parseInt(this.props.count || "2")};
  },
  handleClick: function(event) {
    this.setState({count: this.state.count+1});
  },
  render: function() {
    var count = this.state.count;
    return (
      <div>
        total items: {count}
        <ul>
        {Array(count).join().split(",").map((x, i) =>
          <li key={i}>item {i}</li>
        )}
        </ul>
        <button onClick={this.handleClick}>click to add</button>
     </div>
    );
  }
});
ReactDOM.render(
  <MyList count="3"></MyList>,
  document.getElementById('mylist')
);
</script>Few points to note
-
We pass count 3 to MyList (
<MyList count="3">) which can be accessed using this.props.count. <MyList count=”3″> - We have used jsx code here, In production you should transform it offline and avoid using babel library.
- getInitialState is used to get initial state. It looks for props passed to component. If nothing passed, then it uses default values.
- render is called initially and whenever state is changed.
- We attached a click handler on button “click to add”. The handler changes the state and increments the count.
- Since changes are done in virtual dom and then applied in real dom. It help reduce browser reflow and repaint and makes rendering fast.