InfoHeap
Tech
Navigation
  • Home
  • Tutorials
    • CSS tutorials & examples
    • CSS properties
    • Javascript cookbook
    • Linux/Unix Command Line
    • Mac
    • PHP
      • PHP functions online
      • PHP regex
    • WordPress
  • Online Tools
    • Text utilities
    • Online Lint Tools
search

Chrome extension development tutorials

  • Find a plugin directory location on Mac
  • Extensions - enable developer mode
  • Extension - hello world
  • Extension tutorial - access active page dom
 
  • Home
  • > Tutorials
  • > Web Development
  • > Chrome extension development

Chrome extension tutorial – access active page dom

on Feb 5, 2016

This Chrome extension tutorial will cover building a basic hello world chrome extension where clicking on extension icon will open a popup window containing active page h1 dom element value.

It is recommended that you complete chrome extension hello world extension tutorial before this tutorial.

Here are the steps for this tutorial.

  1. Create manifest.json

    Create a directory hello-world-dom and create manifest.json in that dir. Here is very basic manifest.json for hello world dom extension. Note that this extension needs activeTab permission.

    {
      "name": "Hello World",
      "description": "Hello World Chrome App.",
      "version": "0.1",
      "manifest_version": 2,
      "permissions": [
        "activeTab"
      ],
      "browser_action": {
        "default_icon": "hello-16.png",
        "default_popup": "popup.html"
      }
    }
    
  2. Create default popup html and icon

    We’ll use the following popup.html file.

    <!DOCTYPE html>
    <html style="min-width:300px;min-height:300px;">
      <head>
      </head>
      <body>
        <div id="id1">-</div>
        <script type="text/javascript" src="popup.js"></script>
      </body>
    </html>
    

    and following popup.js file
    var tab_title = '';
    function display_h1 (results){
      h1=results;
      document.querySelector("#id1").innerHTML = "<p>tab title: " + tab_title + "</p><p>dom h1: " + h1 + "</p>";
    }
    chrome.tabs.query({active: true}, function(tabs) {
      var tab = tabs[0];
      tab_title = tab.title;
      chrome.tabs.executeScript(tab.id, {
        code: 'document.querySelector("h1").textContent'
      }, display_h1);
    });
    

    The icon file including full source code is also hosted on github at the link hello-world. Place these three files in hello-world directory.
  3. Load the hello world dom extension in Chrome

    Open chrome extension page by visiting chrome://extensions and then click on load unpacked extension and select hello-world-dom directory.

    Once extension is loaded, you will see hello world extension entry in chrome toolbar.
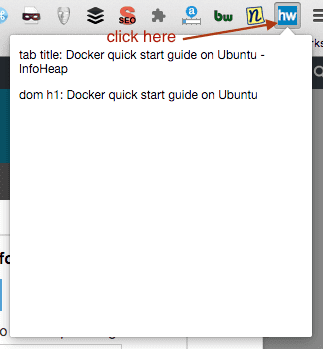
  4. Run the extension

    Look for the hello world extension icon in Chrome toolbar and click on it. You should be able to see a window popup containing current tab page h1 dom element value.
    chrome-extension-hello-world-dom-access

  5. Source code

    You can get the source code used in this tutorial from github hello-world-dom.

Suggested posts:

  1. Chrome – how to access pre-release features
  2. PHP execute command and capture shell exit status
  3. view event handlers in Chrome
  4. How to convert HTML canvas to png image using javascript
  5. Chrome extensions – how to enable developer mode
  6. Apache – list loaded modules on Ubuntu
  7. Gulp quick start tutorial
  8. How to write custom php in wordpress
Share this article: share on facebook share on linkedin tweet this submit to reddit
Posted in Tutorials | Tagged Chrome extension development, Javascript, Tutorials, Web Development
  • Browse content
  • Article Topics
  • Article archives
  • Contact Us
Popular Topics: Android Development | AngularJS | Apache | AWS and EC2 | Bash shell scripting | Chrome developer tools | Company results | CSS | CSS cookbook | CSS properties | CSS Pseudo Classes | CSS selectors | CSS3 | CSS3 flexbox | Devops | Git | HTML | HTML5 | Java | Javascript | Javascript cookbook | Javascript DOM | jQuery | Kubernetes | Linux | Linux/Unix Command Line | Mac | Mac Command Line | Mysql | Networking | Node.js | Online Tools | PHP | PHP cookbook | PHP Regex | Python | Python array | Python cookbook | SEO | Site Performance | SSH | Ubuntu Linux | Web Development | Webmaster | Wordpress | Wordpress customization | Wordpress How To | Wordpress Mysql Queries | InfoHeap Money

Copyright © 2025 InfoHeap.

Powered by WordPress