InfoHeap
Tech
Navigation
  • Home
  • Tutorials
    • CSS tutorials & examples
    • CSS properties
    • Javascript cookbook
    • Linux/Unix Command Line
    • Mac
    • PHP
      • PHP functions online
      • PHP regex
    • WordPress
  • Online Tools
    • Text utilities
    • Online Lint Tools
search

ImageMagick tutorials

  • Install Imagemagick on Mac
  • Install Imagemagick on Ubuntu
  • Create animated gif using Mac preview
  • Create animated gif on command line
  • Edit animated gif speed
  • Find image width and ppi
  • Find image unique colors and bit depth
  • Resize image dimention
  • Compress images
  • Crop image
 
  • Home
  • > Tutorials
  • > Linux/Unix Command Line
  • > ImageMagick

How to create animated gif using Mac preview

By admin on Dec 3, 2015

Mac preview can be used to create simple animated gif by taking multiple screenshots of a window and then stitching then together in Mac preview by exporting as gif. Here are steps to create animated gif for command line Terminal shell on Mac OSX Yosemite. After completing these steps, we would be creating the following animated gif image:
mac-preview-sample-animated-gif-of-terminal-shell_small

  1. Open Mac Terminal and take a window screenshot of it. You can use the following steps:

    1. [SHIFT] + [COMMAND] + 4
    2. [Space] (when you see crosshair icon)
    3. Click on Terminal window.
      Rename the file to terminal-1.png. Here is how it should look:
      mac-preview-animated-gif-terminal-1
  2. Create two more window screenshots.
    1. Type ls in Terminal and take window screenshot. Rename it to terminal-2.png
    2. Hit enter in Terminal and take window screenshot. Rename it to terminal-3.png
  3. Open terminal-1.png in Mac preview and export it as animation1.gif. Follow these steps:
    1. Click on File > Export
    2. [ALT] + [Click on Format] (without [ALT] gif option may not appear)
      mac-preview-export-format-alt-click-on-format-to-select-gif
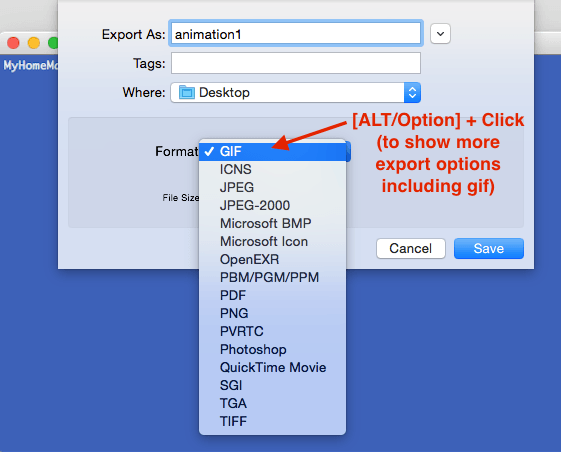
    3. Select gif in format, Unselect Alpha checkbox, type animation1 in filename and click “Save”.
  4. Similarly convert terminal-2.png and terminal-3.png to gif format. We’ll use terminal-1.gif, terminal-2.gif and terminal-3.gif for creating animated gif.
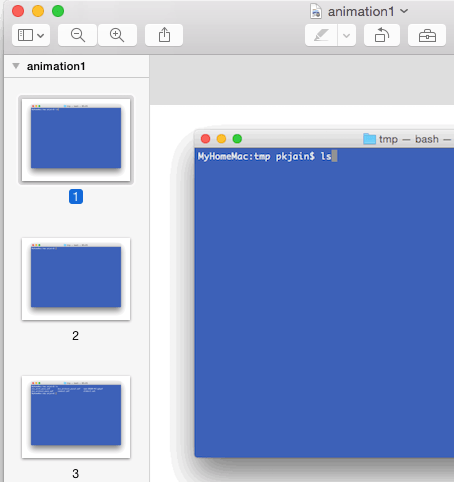
  5. Now open animation1.gif in Mac Preview and make sure Thumbnail pane is also shown. If it is not visible, click menu “View” > “Thumbnails” to make it visible. Drag terminal-2.gif and then terminal-3.gif on thumbnail of animation1.gif in Mac Preview. Make sure these are in correct order. If needed fix the order by dragging these thumbnails. Here is how it should look:
    mac-preview-animated-gif-creation-all-images-in-thumbnails
  6. Now save the animation1.gif by clicking “File” > “Save”. This is our animated gif. View the animated gif in Chrome and see how it is animating. Note that it does not have loop at this stage and might be animating very fast. So you need to view it quickly after loading/reloading in Chrome.
  7. [Optional] Now we’ll change the animation speed and add loop to the animation. If you have imagemagick installed (brew install imagemagick), run the following in relevant folder on Terminal:
    $ convert -delay 50 -loop 0 animation1.gif animation2.gif
    

    This will make an FPS (Frame per seconds) of 100/50 and loop the animation. Here is how the output will look like:
    mac-preview-sample-animated-gif-of-terminal-shell

Suggested posts:

  1. Mysql find current timezone offset
  2. How to enable/disable gmail inbox category tabs
  3. WordPress mysql query to get all custom keys and values for a post
  4. Mac – how to take timed screenshot
  5. PhantomJS – find all fonts-families on a web page
  6. How to edit animated gif speed (FPS) using imagemagick convert
  7. How to create a logo using Inkscape
  8. How to insert multiple rows in google sheets
Share this article: share on facebook share on linkedin tweet this submit to reddit
Posted in Tutorials | Tagged ImageMagick, Linux/Unix Command Line, Mac, Mac Preview, Tutorials
  • Browse content
  • Article Topics
  • Article archives
  • Contact Us
Popular Topics: Android Development | AngularJS | Apache | AWS and EC2 | Bash shell scripting | Chrome developer tools | Company results | CSS | CSS cookbook | CSS properties | CSS Pseudo Classes | CSS selectors | CSS3 | CSS3 flexbox | Devops | Git | HTML | HTML5 | Java | Javascript | Javascript cookbook | Javascript DOM | jQuery | Kubernetes | Linux | Linux/Unix Command Line | Mac | Mac Command Line | Mysql | Networking | Node.js | Online Tools | PHP | PHP cookbook | PHP Regex | Python | Python array | Python cookbook | SEO | Site Performance | SSH | Ubuntu Linux | Web Development | Webmaster | Wordpress | Wordpress customization | Wordpress How To | Wordpress Mysql Queries | InfoHeap Money

Copyright © 2025 InfoHeap.

Powered by WordPress