A quick tutorial to show how to use layers in Inkscape to generate image frame and use Jquery to create a simple animation.
Inkscape layers
Using layers is a powerful concept to manage an image and create multiple frames of an image which can be used in animation. We will create a cartoon head with mouth closed in one layer and opened in another.
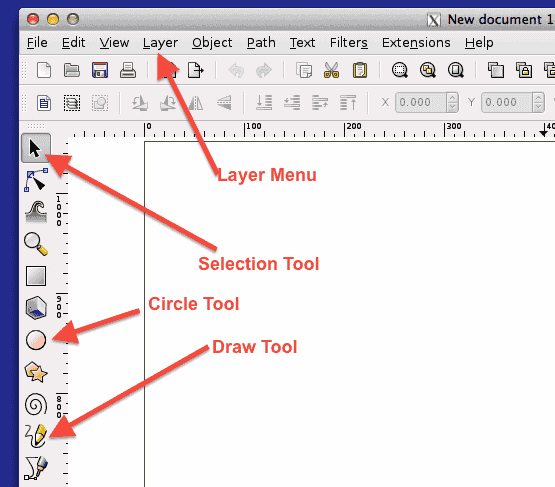
Here is how Inkscape ui looks like with some of the tools highlighted we’ll use in this tutorial.

These are the steps to demonstrate the use of layers:
- First create a new document with 400×400 pixels size (or default size is also fine)
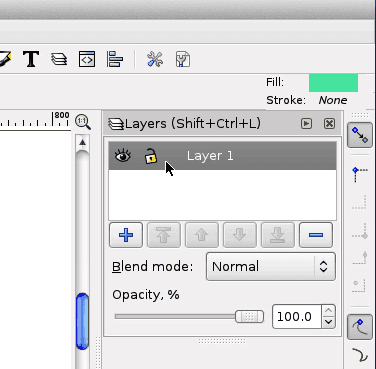
- Click on Layer Menu and then Layers. This is open layer panel. Initially we will have one layer and whatever we create will be in that layer.

- Create a circle (using circle tool) and draw a line (drawl tool) in this layer (Layer 1). After that Click “+” icon in layer panel to create another layer (and name it Layer2)
 This will create a simple graphics in layer 1.
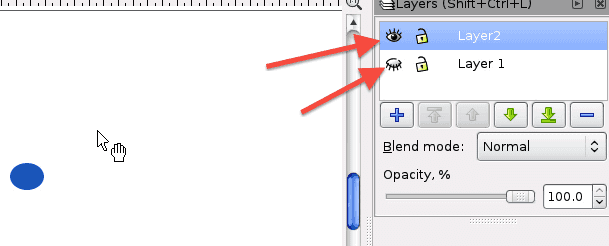
 - Now select Layer 2 from layer panel and create a smal circle as shown:
 Note that Layer 1 in hidden here (little eye icon before the layer name). Now play with the eye icon and view the graphics with various combinations of layers hidden/visible.
 - You can now hide a layer and export the graphics to bitmap. Thus layers can be used to create various flavours of the image with low effort.
Here is the source code of above example: inkscape-tutorial-layers.svg
Here is the video version for creating layers in inkscape part:
Using Jquery for animation

Frame 1

Frame 2

Key-frame animation using above two frames
Jquery Source code for the animation
jQuery(function() {doAnimation();});
function doAnimation() {
  var currentImg = 1;
  var infiniteLoop = setInterval(function() {
    var imgSrc = "/data/inkscape/inkscape-tutorial-layers-frame" + currentImg + ".png";
    jQuery('#animationImg').attr("src", imgSrc);
    currentImg = 3 - currentImg;
  }, 1000);
}