[Update: This article is for Amazon classic. For Amazon VPC instructions may be slightly different]
One has to make couple of choices while installing Linux on AWS/EC2. These can be which flavor of Linux to install, which version to choose, etc. These choices also have pricing impact. This linux install guide is meant for people who are just starting with Amazon AWS.
Which Linux to choose
There are few choices (at the time of writing this article) if you are looking for free linux:
- Ubuntu Server 12.04.2 LTS
- Ubuntu Server 13.04
- Other flavors like Amazon Linux, Centos
Ubuntu is one of the popular choices when it comes to free linux among developers. In case you are more familiar with Red hat linux, then I think Amazon or Centos Linux would be a better choice.
Ubuntu LTS stands for long term support and will have longer support period. Regular Ubuntu will have more up-to-date packages but will have smaller support period. e.g. Here is the version for package phantomjs on 2 Ubuntu flavors.
- Ubuntu Server 12.04.2 LTS: phantomjs_1.6.0-5
- Ubuntu Server 13.04: phantomjs_1.4.0
So unless you are looking for long term support and higher stability, its better to choose Regular Ubuntu Server. For production use LTS is better. For this article we’ll use regular Ubuntu Server.
Region and Availability Zones
Region will impact the price of your instance. Availability zones within a region have same price. You can choose North Virginia, California, etc. as region. North Virginia is least price option. If you are building a global site, then it is a good option. We’ll use North Virginia for the purpose of this article. For high availability and high durability, a site can also be hosted in multiple availability zones and regions. That discussion is beyond the scope of this article but at some point you should consider looking into that.
Reserved vs On-demand instance
On demand instance are billed pay per use with no upfront cost. In reserved instance, you have to pay an annual fee and you enjoy less per hour charges. Reserved instances are cheaper for a 1 year duration. But if you are not sure about your usage, its better to go with on-demand instance. Once you can predict your usage/type etc for a year, you can try reserved instance.
Micro instance vs Small
Amazon also offers 1 year free micro instance (if you qualify). So its a good idea to take benefit of it if you are just starting. For somewhat significant traffic sites (3000+ visitors a month), I would suggest to take small instance (or higher depending upon traffic).
Steps to install Ubuntu Linux on EC2
These are the steps to install Linux on EC2. We’ll install Ubuntu Linux version 13 in North Virginia availability zone.
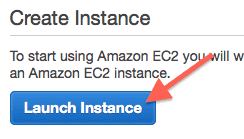
- Visit Amazon EC2 page and select North Virginia as region if it is not selected as default region. Then click on launch instance as shown:
- You will see options like classic instance and quick instance as shown below:
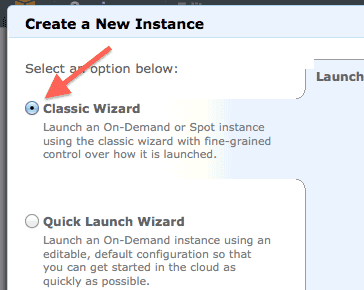 You can choose classic instance. In case you want to reuse existing private key, you can use quick launch wizard.
 - Next screen (choose an AMI), select Ubuntu Server 13.04 (64 bit).
- Next screen (instance details), Choose T1 micro (t.micro, 613MiB) and no preference for availability zone. You can choose higher instance like small or medium in case you need that.
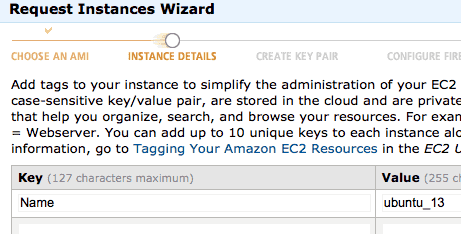
Keep default options on instance details – 2nd screen. Make sure shutdown behavior is set to “stop”. Click continue till you are asked for instance name (key=name). Enter any name e.g. “ububtu_13” as shown below.
- On next screen (create key pair), either choose an existing key or create new one. We’ll create a new one and call it ubuntu_23_keypair. Here is how the screen looks like.
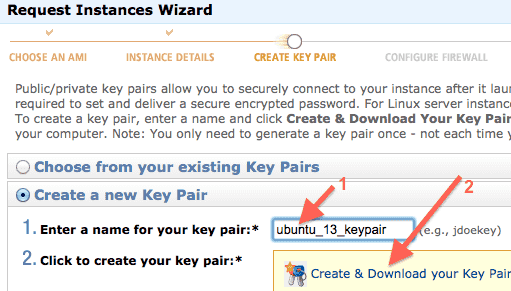 Save the key and keep a backup at safe place.
 - Select the default security group in “configure firewal” screen and click continue.
- Last screen is review screen. Click launch on it.
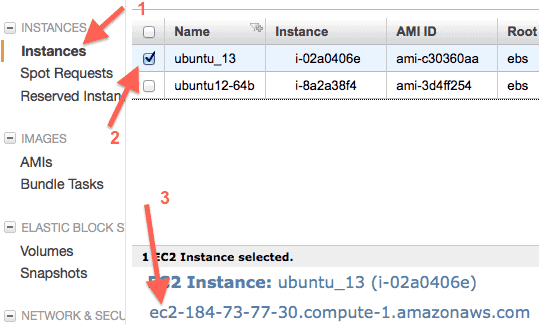
- Go to Instance page (click on instances on the left navigation) and select the instance you just created. Look for its hostname as shown below:
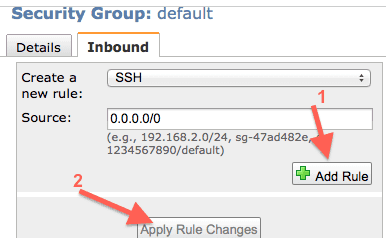
- You may also have to add ssh entry (to open ssh port) to your security group (inbound section) if it does not have one. Here is how the screen to add ssh entry to security group looks like:
- Here is the command (assuming provate key file is ubuntu_13_keypair.pem) to login to your instance:
chmod 600 ubuntu_13_keypair.pem
ssh -i ubuntu_13_keypair.pem ubuntu@ec2-184-73-77-30.compute-1.amazonaws.com
(Replace hostname your hostname value)


