When we browse a web site, the browser first do a DNS lookup to find the IP address of the domain name. We can override this IP by an IP of our choice so that browser hits the IP we want instead of the IP obtained from DNS server. Now why would someone want to override the IP mapped to a specific domain? Here are some reasons:
- As a developer you may want to hit a specific server to debug. If you have multiple server behind a load balancer or multiple aname records for a domain name, you may hit any of the IP addresses. Overriding it lets you hit a specific server.
- If you are migrating your site, you may want to set it up on a new ip address first and then change the mapping locally to test the new site before permanently migrating.
Steps on Mac or Linux using hosts file
- Edit /etc/hosts file using
sudo vi /etc/hostsand add this entry:aaa.bbb.ccc.ddd www.yourhostname.com
Here replace aaa.bbb.ccc.ddd with the desired IP address. You can also put multiple host entries separated by space.
- Now ping www.yourhostname.com (or whatever domain name you have setup) using:
ping www.yourhostname.com
This should show some like this:
PING www.yourhostname.com (aaa.bbb.ccc.ddd): 56 data bytes
...
...
Ensure that the ip address matches with what you entered in the hosts file.
- If you are running a web server at the ip address mentioned in the hosts file, then access http://www.yourhostname.com/ in your browser and you will hit the desired ip address.
Steps on Windows 7 using hosts file
These are the instructions for window 7. For other window versions steps may be slightly different.
- We can modify hosts file using notepad running as administrator. Open Notepad as administrator by right clicking on Notepad program and selecting “Run as administrator” as shown below:

- Edit the hosts file using notepad. The file location is c:\windows\System32\drivers\etc\hosts
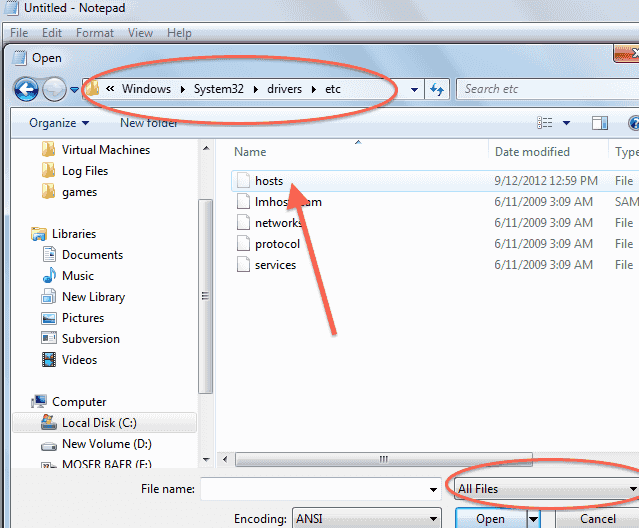 Make sure that “All Files” is selected instead of “text documents” as this file does not have .txt extension.
 - Edit the file and put desired ip address and domain name (hostname) as mentioned above. e.g.
aaa.bbb.ccc.ddd www.yourhostname.com
While saving ensure that it is saved as hosts file and not hosts.txt. To do this make sure “All files” is selected instead of “Text Documents”. Otherwise windows may put a .txt extension automatically while saving. If that happens override won’t work.
- Ping the hostname to verify if www.yourhostname.com points to correct entry. You may have to enable the command line utility ping on windows in case it is not enabled.


