InfoHeap
Tech
Navigation
  • Home
  • Tutorials
    • CSS tutorials & examples
    • CSS properties
    • Javascript cookbook
    • Linux/Unix Command Line
    • Mac
    • PHP
      • PHP functions online
      • PHP regex
    • WordPress
  • Online Tools
    • Text utilities
    • Online Lint Tools
search

Networking tutorials

  • DIG quick start tutorial
  • Dig - list all dns records
  • How to view wifi connection speed on Mac
  • Linux iptables - Nat port forwarding using PREROUTING
  • Linux iptables and ip6tables examples
  • Ngrep - quick start guide
  • Use nc to check if a remote port is reachable
  • Use nc to listen to tcp or udp port
  • Use nc to test HTTP url redirection
  • add more DNS servers to Wi-Fi interface on Mac
  • locally override website host to IP mapping
  • use nc to print headers from browser
 
  • Home
  • > Tutorials
  • > Networking

How to add more DNS servers to Wi-Fi interface on Mac

By admin on Oct 23, 2015

When you are using WiFi or wired network using home broadband or mobile hotspot, you are assigned a default DNS server. It sometimes may be slow. It may be better to add few DNS server as backup DNS server in you Wifi or wired network interface. Here are quick steps to add Google public DNS servers (8.8.8.8 and 8.8.4.4) to Wi-Fi network interface on Mac:

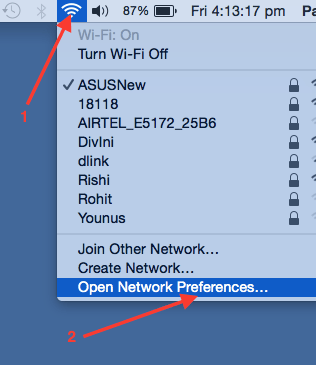
  1. First open the Network preferences by clicking on Wifi icon on top menu toolbar and then clicking on “open network preferences” sub menu as shown below:
    mac-wifi-menu-expanded-and-network-preference-highlighted
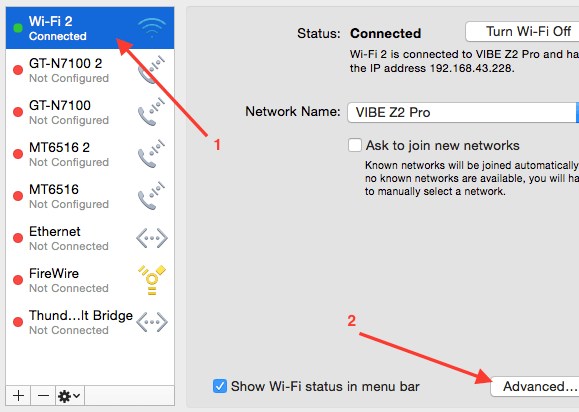
  2. Select the WiFi interface in left pane and then click on advanced settings button as shown below:
    mac-network-wifi-settings-advanced-hghlighted
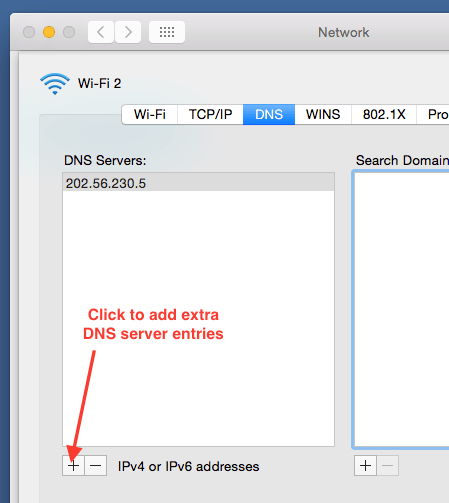
  3. Click on DNS tab to Select DNS settings. Then click on plus icon as shown below to add more DNS server.
    mac-network-settings-dns-plus-highlighted
  4. Add public Google DNS servers (8.8.8.8 and 8.8.4.4) after the already existing DNS server. Note that the order of these DNS servers does matter and it is better to keep the new DNS servers after the already existing servers. You can also use minus icon to remove the unwanted DNS server later if needed. You can also optionally change the order of these DNS servers by dragging the DNS IP addresses in UI.
    mac-network-settings-google-dns-servers-added
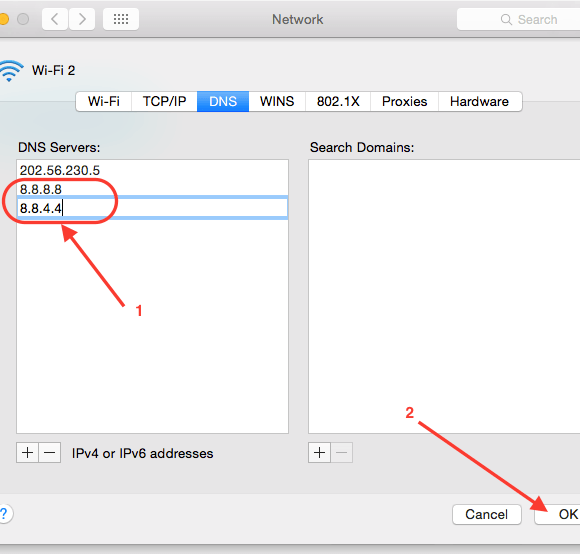
  5. Once IP addresses are entered, click ok and then click Apply button to ensure changes are applied.
  6. Run to following command to list the DNS servers set on you machine.

    $ cat /etc/resolv.conf
    #
    # Mac OS X Notice
    #
    # This file is not used by the host name and address resolution
    # or the DNS query routing mechanisms used by most processes on
    # this Mac OS X system.
    #
    # This file is automatically generated.
    #
    nameserver 202.56.230.5
    nameserver 8.8.8.8
    nameserver 8.8.4.4
    

    Note the presence of entries 8.8.8.8 and 8.8.4.4.

Suggested posts:

  1. How to change computer display name on Mac
  2. How to customize wordpress rss feed
  3. svn – how to undo last commit
  4. Some handy linux gnu date commands
  5. Mac Finder – how to change default folder
  6. haxe openfl on mac – quick start guide for mobile development
  7. Mac VirtualBox – enable copy paster from/to Windows 10
  8. How to view wifi connection speed on Mac
Share this article: share on facebook share on linkedin tweet this submit to reddit
Posted in Tutorials | Tagged Mac, Networking, Tutorials
  • Browse content
  • Article Topics
  • Article archives
  • Contact Us
Popular Topics: Android Development | AngularJS | Apache | AWS and EC2 | Bash shell scripting | Chrome developer tools | Company results | CSS | CSS cookbook | CSS properties | CSS Pseudo Classes | CSS selectors | CSS3 | CSS3 flexbox | Devops | Git | HTML | HTML5 | Java | Javascript | Javascript cookbook | Javascript DOM | jQuery | Kubernetes | Linux | Linux/Unix Command Line | Mac | Mac Command Line | Mysql | Networking | Node.js | Online Tools | PHP | PHP cookbook | PHP Regex | Python | Python array | Python cookbook | SEO | Site Performance | SSH | Ubuntu Linux | Web Development | Webmaster | Wordpress | Wordpress customization | Wordpress How To | Wordpress Mysql Queries | InfoHeap Money

Copyright © 2025 InfoHeap.

Powered by WordPress