InfoHeap
Tech
Navigation
  • Home
  • Tutorials
    • CSS tutorials & examples
    • CSS properties
    • Javascript cookbook
    • Linux/Unix Command Line
    • Mac
    • PHP
      • PHP functions online
      • PHP regex
    • WordPress
  • Online Tools
    • Text utilities
    • Online Lint Tools
search

Inkscape tutorials

  • SVG - beginner tutorial
  • Animation using Inkscape and Jquery
  • How to create a logo using Inkscape
  • How to create and use color palettes in Inkscape
 
  • Home
  • > Tutorials
  • > Inkscape Tutorials

How to create a logo using Inkscape

By admin | Last updated on Jan 13, 2016

It is a quick tutorial on creating a very simple svg (scalable vector graphics) logo using Inkscape and then later export it to png format. The purpose is not to create a professional logo but to do a quick Hello Word beginner tutorial to get familiar with Inkscape UI.

Inkscape is free open source vector graphics tool and works on Windows, Mac and Linux. It can be downloaded from here.

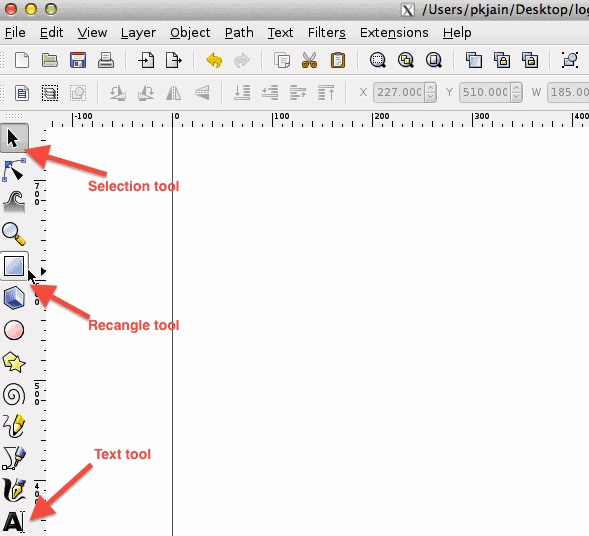
Here is how Inkscape ui looks like with some of the tools highlighted we’ll use in this tutorial.

inkscape-ui

These are the steps to create the logo:

  1. First create a new document with default settings.
  2. Click on rectangle tool (highlighted above) and create a small rectangle large enough to serve as background for logo.
  3. Make sure selection tool is highlighted. Now select rectangle and click on fill color icon at the botton left.
    inkscape-ui-fill-color-action-icon
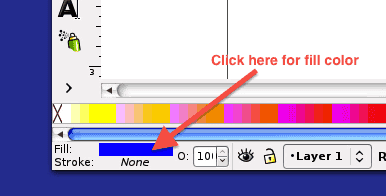
  4. This will open the color selection ui as shown below.
    inkscape-ui-fill-color-selection
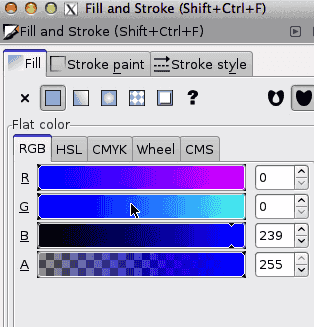
Select any color (preferably dark) by adjusting Red, Green Blue (RGB) components. For now ignore other options.
  5. Now click on text tool from left menu panel (shown above). Type any text. For this example we will use “foobar”.
  6. Again using selection tool, click on text. Adjust its position and place it in the center of the rectangle. Don’t worry if it is not exact center.
  7. Now double click on text. This will let you select any portion of the text. Select first half and change its fill color to white. Follow steps similar to fill color for rectangle. Now change fill color for 2nd part.
  8. Thats it! Now from File menu you can save it as svg file and then export it as bitmap.


Source file from this tutorial can be downloaded from this link:
inkscape-tutorial-hello-world-logo.svg

Here is the video version of this tutorial.

Suggested posts:

  1. How to use wordpress facebook plugin comments box with lazy loading
  2. Comic strip – Tech CEO vs MLM Executive
  3. Mailchimp lightweight subscription form code
  4. Some lessons and humour on entrepreneurship
  5. How to return a value from bash function
  6. How to install new fonts in Photoshop on Windows
  7. How to upgrade wordpress manually
  8. How to install node.js on Ubuntu Linux
Share this article: share on facebook share on linkedin tweet this submit to reddit
Posted in Tutorials | Tagged Inkscape Tutorials, Tutorials
  • Browse content
  • Article Topics
  • Article archives
  • Contact Us
Popular Topics: Android Development | AngularJS | Apache | AWS and EC2 | Bash shell scripting | Chrome developer tools | Company results | CSS | CSS cookbook | CSS properties | CSS Pseudo Classes | CSS selectors | CSS3 | CSS3 flexbox | Devops | Git | HTML | HTML5 | Java | Javascript | Javascript cookbook | Javascript DOM | jQuery | Kubernetes | Linux | Linux/Unix Command Line | Mac | Mac Command Line | Mysql | Networking | Node.js | Online Tools | PHP | PHP cookbook | PHP Regex | Python | Python array | Python cookbook | SEO | Site Performance | SSH | Ubuntu Linux | Web Development | Webmaster | Wordpress | Wordpress customization | Wordpress How To | Wordpress Mysql Queries | InfoHeap Money

Copyright © 2025 InfoHeap.

Powered by WordPress