InfoHeap
Tech
Navigation
  • Home
  • Tutorials
    • CSS tutorials & examples
    • CSS properties
    • Javascript cookbook
    • Linux/Unix Command Line
    • Mac
    • PHP
      • PHP functions online
      • PHP regex
    • WordPress
  • Online Tools
    • Text utilities
    • Online Lint Tools
search

Android user guides

  • Android - enable system ui tuner
  • Android - install android 8, 9 from OTA images on pixel 2
  • Android screenshots
  • Chrome - site bookmark on home
  • Clear default app
  • Disable android auto update
  • Disable dropbox photo auto upload
  • Install google camera on Asus m1 max pro
  • Lollipop - add clock widget to home
  • Lollipop - enable Chrome tabs
  • Root Pixel 2 with Android Pie using TWRP and Magisk
 
  • Home
  • > Tutorials
  • > Android

How and why disable android auto update

By admin on Nov 17, 2015

Android default auto-update setting updates android applications whenever your mobile is on WiFi internet connection. While this may be a good thing for some people, it can be annoying to see auto-update activities the moment your android phone come on WiFi. Here are some reasons you should switch off auto update completely:

  1. It will consume internet bandwidth and this may be a concern if you have limited bandwidth. Also if you are at work, many android mobile phones can take a significant portion of the bandwidth impacting the work bandwidth.
  2. Too many updates can impact mobile performance. Some apps are of big size and you don’t want to update them automatically

Steps to switch off auto update

These are quick steps to switch off auto update completely on android mobile. We’ll use android lollipop for the purpose of this article.

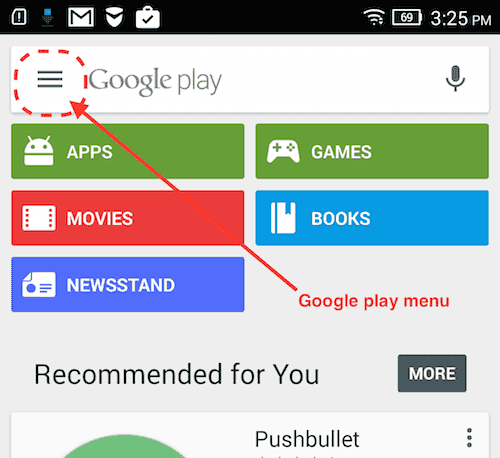
  1. First open Google play app and look for menu icon at top left. Click on it as shown below:
    android-google-play-home-screen-menu-highlighted
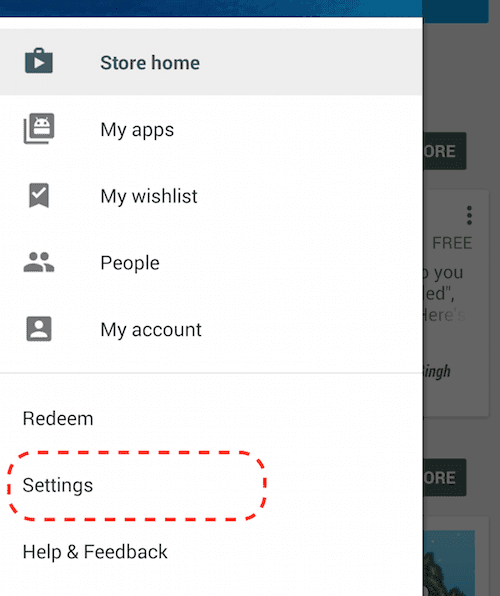
  2. Once you see Google play main menu list, click on setting menu item as shown below:
    android-google-play-setting-menuooption-highlighted
  3. Look for Auto-update-apps item on setting screen and select it as shown below:
    android-google-play-auto-update-menu-highlighted
  4. This will bring up various options for app auto update. Select “Do not auto-update apps” as shown below:
    android-google-play-auto-update-all-options-screen

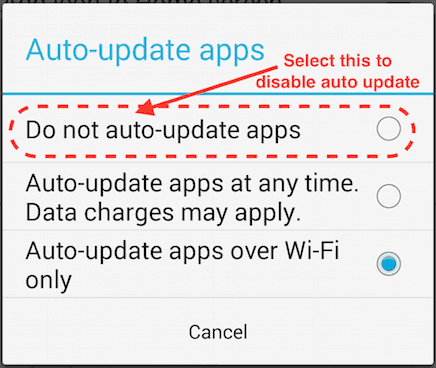
Note that this will mean if you will have to manually update an app whenever needed. Usually good apps automatically notify you if you are using an old version and there are significant changes. This way important and frequently used apps can be manually updated.

Suggested posts:

  1. svn – how to undo last commit
  2. How to delete orphan wordpress wp_postmeta rows
  3. How to change default chrome search engine
  4. Handle pagination in wordpress custom php code
  5. How to find docker host ip on Mac
  6. How to view your WiFi password on Mac
  7. Android – install android 8, 9 from OTA images on pixel 2
  8. How to take screenshot on android phone
Share this article: share on facebook share on linkedin tweet this submit to reddit
Posted in Tutorials | Tagged Android, Tutorials
  • Browse content
  • Article Topics
  • Article archives
  • Contact Us
Popular Topics: Android Development | AngularJS | Apache | AWS and EC2 | Bash shell scripting | Chrome developer tools | Company results | CSS | CSS cookbook | CSS properties | CSS Pseudo Classes | CSS selectors | CSS3 | CSS3 flexbox | Devops | Git | HTML | HTML5 | Java | Javascript | Javascript cookbook | Javascript DOM | jQuery | Kubernetes | Linux | Linux/Unix Command Line | Mac | Mac Command Line | Mysql | Networking | Node.js | Online Tools | PHP | PHP cookbook | PHP Regex | Python | Python array | Python cookbook | SEO | Site Performance | SSH | Ubuntu Linux | Web Development | Webmaster | Wordpress | Wordpress customization | Wordpress How To | Wordpress Mysql Queries | InfoHeap Money

Copyright © 2025 InfoHeap.

Powered by WordPress